Photoshop is very advanced software, but it has certain tools that even beginners can use easily to create stunning effects. For example, you don’t need special skills to create animated GIFs!
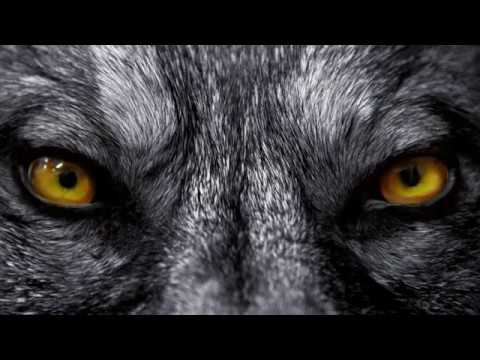
In this tutorial I will show you how to create an animation of a wolf with glowing eyes, and this will teach you all you need to know about creating GIFs in Photoshop.
What You Will Need
You
can use any photo you wish, but make sure it’s high quality and with
the eyes well visible. You can download the photo I’ve used here:
1. How to Prepare an Image for Animating
Step 1
GIF is not a well-optimized format, and its files can get very large very quickly. That’s why we need to crop our image to what’s the most important. Open the image, take the Crop Tool (C), and select the part of the image you want to animate. Then hit Enter.


Step 2
We want to animate the eyes, so we need to separate them from the rest of the image. There are many methods to select something in Photoshop, but I’m going to show you the easiest one.
Go to Select > Color Range. Select Add to Sample and click all the shades of the eye, until you see them all painted white in the preview.

Step 3
We’ve selected all the yellow tones, but some of them can be found in the seemingly gray fur. To exclude them, play with the Fuzziness slider until there’s only black around the eyes. It’s very important to keep this area completely black!

Step 4
After you press OK, a selection will be created. As with any automatic selection, though, it’s not perfectly accurate. Go to Select > Refine Edge and use these settings to make the selection smoother. Select Smart Radius and play with the Smooth and Feather options until you’re happy with the result. Then click OK.

Step 5
Copy the selection to a new layer with the shortcut Control-J.

Step 6
Last thing: our image is very big, and it’s not what GIF format likes (it’s not well optimized, and it creates huge files!). Go to Image > Image Size and lower the size to something reasonable.

2. How Frame Animation in Photoshop Works
Step 1
We’re ready to create an animation now! Go to Window > Timeline to open our editor. Then press Create Frame Animation.

Step 2
The Timeline editor is very simple. Click the arrow next to Once to reveal the options for repetition. You can make the animation play once, 3 times, forever, or a chosen amount of times. Set it to Forever to make it play constantly.

Step 3
The other important option is the duration one frame is played for. The lower the time, the faster it will disappear and the smoother the motion, but also the more frames are required for this effect.

We want a smooth transition, and we’re going to have a lot of frames, so click Other and type 0.06.

Step 4
To create a new frame, click the white card icon in the lower bar.

Step 5
Each frame remembers the state of the layers separately. So if you hide a layer in one frame, in the other it will still be visible. Caution: Photoshop likes playing tricks here, so make sure you always start from the first frame.
Hide a layer in one frame and test the animation by pressing Space. This is the main thing this tool does: it hides and reveals layers according to their state saved in the frames.

3. How to Use Tween Transition in Photoshop
Step 1
But hiding and revealing layers is not all it does! Three other things can be saved in each frame:
- Position
- Opacity
- Effects
This means that you can change these things on a single layer in one frame, and in another frame the same layer will be intact (again, make sure you start from the first frame to avoid surprises). And the best thing about it is that Photoshop is able to create an automatic transition between these states of a single layer! Let me show you this trick on the most effective of the states available: effects.
Make all the layers visible on both frames again, and then select the second frame and right click the layer with the eyes. Select Blending Options. Find Color Overlay and check it.


Step 2
Select the gray rectangle and change the color to something bright.


Step 3
Change the Blend Mode to Screen to make the eyes bright red instead of simply covering them with red.


Step 4
Find Outer Glow and check it.


Step 5
Give it the same bright color as before.


Step 6
Make the glow stronger by playing with Spread and Size.


Step 7
We have a very simple animation now—test it by pressing Space.

Step 8
But it’s not a very convincing effect, is it? It would be much better if the eyes lit up gradually. This is where the real power of this tool lies! Hold Control and click both layers to select them. Click the little arrow in the upper right corner and select Tween.

The more frames you add, the smoother the transition, and the bigger the animation. 10 should be a reasonable number.

Step 9
Click OK to see a whole set of new frames between the ones you’ve selected. Press Space to see the animation. Much better, isn’t it?


Step 10
There’s one issue with this animation—the eyes fade too abruptly. Let’s fix this by creating another transition. Select the first and last frames again, and Tween them with the same number of frames as before.

Step 11
One last thing: find the frame with the brightest eyes and change its duration to a higher number. This will make the eyes shine longer.

Perfect!

Step 12
Finally, it’s time to save the animation to present it to the world. Go to File > Save For Web and select GIF from the list of formats. The options here will let you optimize the animation for smaller size.
A bonus trick: if you want your animation to be prettier than what GIF format has to offer, you can record the playing animation with some kind of software (or export as a video), save it as a video, and then covert it to a semi-GIF with www.gfycat.com.